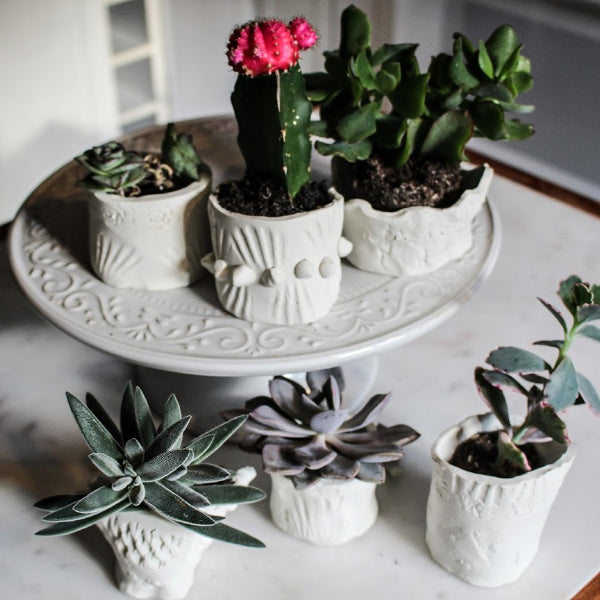
DIY Clay Planter Pot
Materials
- White Oven Bake Clay (we use Sculpey)
- Parchment or Wax Paper
- Cutting Tool (Exacto Knife or similar)
- Small Rolling Pin
- Found Objects to make patterns (we used only objects found in nature, shells, pine cones, rocks, acorns, etc.)

Set up your work space by covering it with parchment or wax paper. Make sure your hands, table, and tools are all very clean because the white clay picks up and shows dust and dirt very easily. Soften the clay with your hands and knead until workable. Roll out one ball into a disc about ¼’’ thick, this will be the bottom of your pot. Trim to desired size and cut out a drainage hole in the center with your knife.

Roll out a larger piece to same thickness and make side walls that will fit entirely around your bottom circle. You may use a straight edge or a template to trim all the sides, if you’d like to be precise. Working with a 5 year old, I was much less concerned with perfection! I actually preferred the more organic free form shapes that happened this way.
Once your side wall is rolled out and trimmed to size, take your found objects and see what patterns you can make with them by pressing into the clay. You can always practice on scrap pieces beforehand to get an idea of what will happen. We were happily surprised when the tip of a pinecone created a rosette shape.


When you are done adding the pattern and texture, piece the wall and bottom circle together by pressing the clay together on the inside and bottom where the seams meet.

Another way of forming the pots which is much simpler and more organic is to mold the shape from one single ball of clay and trim and press objects after the pot is formed. For younger children this is sometimes a better method and the one my son preferred.

Bake according to package directions, let cool, and add plants!


Love,
Carey and Theo

_______
Shop Harlem Hill:
Leave a comment